
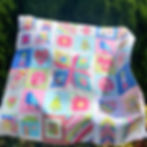
JOINING 36 BLOCKS TOGETHER QUILT AS YOU GO!
- Monica Poole
- Oct 29, 2021
- 3 min read
Updated: Feb 16
FREE QAYG ALONG PART 15
This week we had a lot of fun joining our quilt and recording the footage for our YouTube video. Click on the link below to watch the video.
We love making the videos together and teaching others to quilt and sew and we plan on making many more!
I love the back just as much as I love the front!

We'll be finishing our quilt with a fancy picket edge and we'll show how to do this in the next video. Haven't heard about our FREE QUILT AS YOU GO ALONG? You can read all about it here.
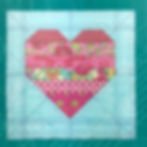
The picket edge is the same edging as the Cherry Cheer quilt that is pictured below.

To join the blocks together we used our Easy Cover Strip method. The cover strip is a 2" strip that is prepared with a 1" bias tape maker. (Your strips don't have to be cut on the bias).
Instead of cutting and preparing my cover strips with a 1" bias tape maker, I used pre-made 1" cotton bias. You can use pre-made bias but I recommend that it's 100% cotton and the edges meet on the back of the strip, beware of thin polycotton bias binding, it's too thin and see through. If you want to use pre-made bias, you will need 16 m (17 yards) to join the blocks and an additional 6.5 m (7 1/2 yards) to join on the picket edge, otherwise you can finish your quilt with a regular binding, for this you will need 65 cm (3/4 yard).

The blocks started as 10” squares with a ½” gap of batting all around the edge. The ½” gap allows for a bit of shrinkage, a bit of shifting and a bit of trimming. My blocks shrunk about 1/8” during the making process. So, when you trim, try to trim an even amount away from each edge. This will leave you with a gap of batting that is about 3/8” away from the edge, it’s ok if this is not exact and some of the batting gets caught in the seam, it just works out well not having the batting all the way though the seam allowance as it reduces the bulk in the seam, which means that the seam will sit nice and flat.
If you don’t have a square ruler that is big enough to trim the blocks you can make a
9 ¾” square template with template plastic which is usually available from your local quilting store, or you can also use any clear or opaque plastic that you are able to cut with your scissors such as clear vinyl that is used for tablecloths.

To make a template, use a fine tip permanent marker to draw up the square. Cut the square out with scissors. (Not your good fabric scissors lol). Mark diagonal lines from the corners and then mark the centre vertical and horizontal lines. I also marked a border that was 1 1/8” around the edge and then another that was 1 3/8” around the edge. Make sure that the marks are dry and wipe over with some paper towel before you use the template on your fabric.
The centre lines and border lines will help you to square up the blocks, make sure that they are as centred as possible. You’ll see in the photos below that you can use the marked border lines to align them with the border seams on the blocks. Mark around the edge of the template with a fabric marker, remove the template and use your patchwork ruler and rotary cutter to trim the blocks. It’s not advisable to use a rotary cutter against a thin template, as you could slip and cut your fingers.


Once your blocks are trimmed, watch the video below to see how to join them together with my Easy Cover Strip Method.
This method is fully machine-sewn and can be used on the front or back of the quilt, with this quilt I put the cover strips on the back, so that there is no interruption between the blocks, giving the quilt a traditional look.
I’ve made many quilts with this method in all different sizes and configurations, for some inspiration you can check them all out on our website here we have lots of PDF patterns and even some e-books.
If you don’t already know, when you buy 4 PDF patterns on our website, you get one FREE! Just add 4 PDF patterns to your cart and use the code FREEPATTERN at the checkout to get your FREE PDF pattern.
Wishing you a happy and creative weekend!
Monica and Alaura xxoo